Do you know that you can now open multi window mode on your android device running on Android M Developer Preview build MPZ44Q.
Multi-window facility means it give the ability of viewing more then one window side by side. This function is now accessible via the recent menu by selecting the new icon appearing on the left of the X icon.

It has been claimed by folks at Android authority that multi-window feature of Android M works great at Nexus 5. They faced no app crashes or other issues.
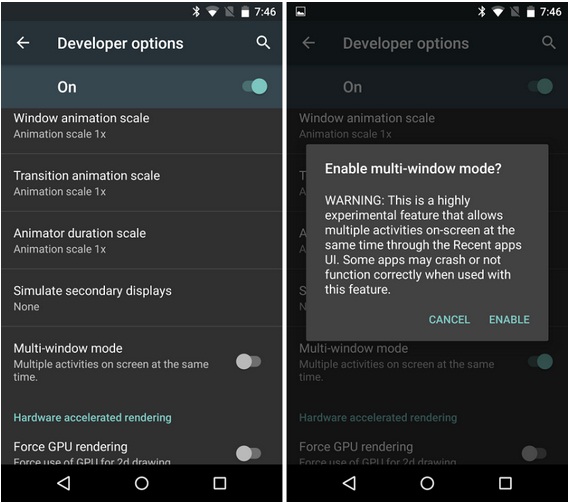
Note that when you try to use/enable this feature , you will be prompted with a warning like the screen below.
How to enable Multi-window on Android M build on Nexus 5, 6 and 9
1. At first you need to have the latest Android M ADB drivers or previews drivers
2. Now Install TWRP recovery at your device
Now boot your phone into recovery mode. At first turn off your device then press hold volume down, volume UP & power button together to reboot to the fastboot mode. Now use your phone’s volume button to go to the Recovery button. Press power button to select. Thus your device will boot into the Recovery mode.
3. now connect your android phone with the computer via USB cable.
4. While in the TWRP select Mount and check System Option. Thus you are able to access the build.prop file from the device
5. Install ADB on your computer and make a new folder on the desktop and rename it to “multi-m”
6. now open the folder that you just created. Launch a command window (cmd) in “multi-m”. In order to do that you need to right click on the emty space of that folder while hoklding the Shift button and then choose :Open command window here”
7.Then copy/paste the following command and hit enter key: adb pull /system/build.prop
8. It will open the build.prop file in the system partition
9. Now the build.prop file will be accessible via the folder multi-m. Now open the file with the Notepad++ text editor. Don’t disconnect the phone.
10. Now locate the ro.build.type line in the build.prop file. It will be line no. 12 in the build.prop for Nexus 5.
11. You will find a text “user” after that. You need to change it to userdebug
12. Now you have to save the file. Close the Notepad++ . Let’s add the edited build.,prop back into device’s system partition by replcaing the old one and setting the permission back.
13. Let’s return to the command window. Then copy/paste the command below adb push build.prop /system/
14. type adb shell and hit enter key
15. Now type cd system and press enter gain
16. Set permission on the build.prop file . Now copy & paste the following command and press enter key : chmod 644 build.prog
17. Now exit from the adb shell. Type exit and press enter key. That will suffice to exit from the adb shell
18. Uncheck the System Option in mount in your device
19. Now go to the TWRP main screen and then tap Reboot> System. You will be prompted for SuperSU installation, hit “do not install” . This is because SuperSU is still not compatible with the android M.
20. Right after the device boots up, go to the Settings > Developer Options > Drawing section and you will find an option Multi-Window mode. Now enable this option via toggle button and our task is done .
Source: XDA