How to Install Stock Firmware on Samsung Galaxy Devices With Odin
How to Install Stock Firmware on Samsung Galaxy Devices With Odin
Install stock firmware like recovery on Samsung Galaxy Devices with Odin tool.
Pre-requisites:
- Charge your Phone to at-least 80%
- Enable USB Debugging by Going to Settings > About device > Build Number and tap it seven times. You will see that “Developer mode has been Enabled” head over to Settings and you will see “Developer Options”. Tap it and got to USB Debugging option the check the box to enable USB Debugging
- Take a proper backup of important data and media files through cloud and Google Sync
Install USB Drivers:
I am assuming that you don’t have the drivers installed in your PC ; to install them please download Samsung Drivers or Samsung Kies. However, you need to close the Samsung Kies software while you are using ODIN or flashing firmware as it might cause problem with the procedure.
Download Odin Tool
Download the latest Odin Tool for flashing from : Latest Odin Tool for Samsung
Reboot Samsung Galaxy Device into Download Mode:
Samsung Galaxy Devices need to go to Download Mode that will prepare your device to receive data from your PC via a dedicated flashing tool named ODIN. Follow the steps below to go to the Download Mode on Samsung Galaxy Devices:
Step 1: Turn off your device
Step 2: Press Volume UP + Home + Power button at the same time for 2-3 seconds
Step 3: You will see a warning screen with a yellow triangle sign , press the Volume Up key to enter into Odin/Download mode
Step 4: Right after you press the Volume Up key your Galaxy Device will go to Odin Mode which means that you can proceed with installing firmware on your Galaxy devices. You can install CF-Auto-Root or CWM/TWRP recovery files also
How to Install Stock Firmware With Odin:
Step 1: We are assuming that you have already finished the tasks before and you have the firmware/recovery files with yourself. If you have a firmware then the file extension should be .tar.md5. However if it is in rar/zip format then extract it. If you are installing recovery like CWM or TWRP then the file extension should be either .tar or .tar.md5
Step 2: Download the latest Odin zip file from the link above.
Step 3: Open the Odin3 Vx.xx.exe ,which will open the Odin Tol
Step 4: Switch off your Samsung Device and go to download mode by following the above method
Step 5: Connect the Samsung device to the computer by using a USB cable
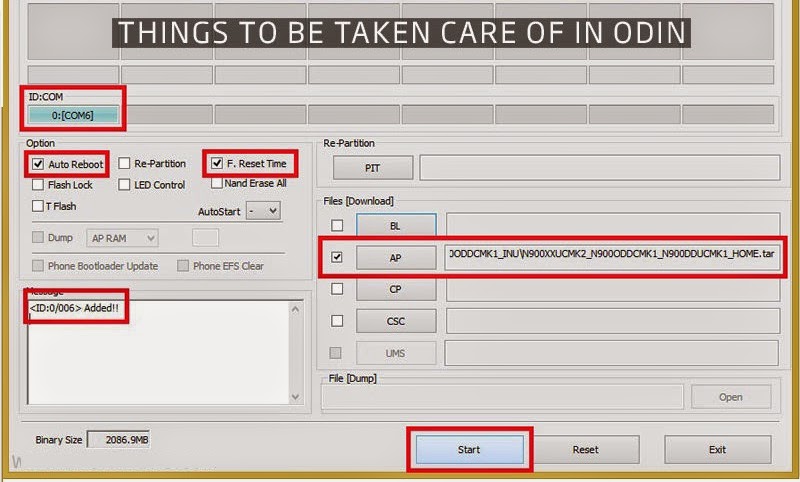
Step 6: After connecting the device ID:COM port on Odin will turn Blue /Yellow depending on the version of the Odin you are using. You will see Added message to indicate the successful connection .
Step 7: If your phone is not detected by Odin then follow these steps:
→Reboot your device and turn off US Debugging and turn it on again
→Uninstall & re-install the USB drivers again
→Reboot your PC and change the USB cable /ports
Step 8: Now click the AP button (Odin v3.09 or 3.10) or the PDA button (older version of Odin)
Step 9: Navigate and select the file with .tar/t.tar.md5 extension
Step 10: In the options section, ensure that only Auto Reboot & F.Reset Time boxes are checked and every other things should be unchecked (do not check Re-Partition box unless you are flashing .PIT file)
Step 11: Before initiating anything check the settings like this picture

Step 12: After checking this just click on the Start button on Odin to start installation . It might take few seconds for Recovery File / CF-Root and 2-4 minutes for firmware.
Step 13: Successful Odin Flashing is indicated by PASS! or RESET ! message on Odin and then your device will restart after the process is complicated

